Clustering Server 2012 R2 with iSCSI Storage
Yay, last post of 2014! Haven’t invested in the hyperconverged Software Defined Storage model yet? No problem, there’s still time. In the meanwhile, here is how to cluster Server 2012 R2 using tried and true EqualLogic iSCSI shared storage.
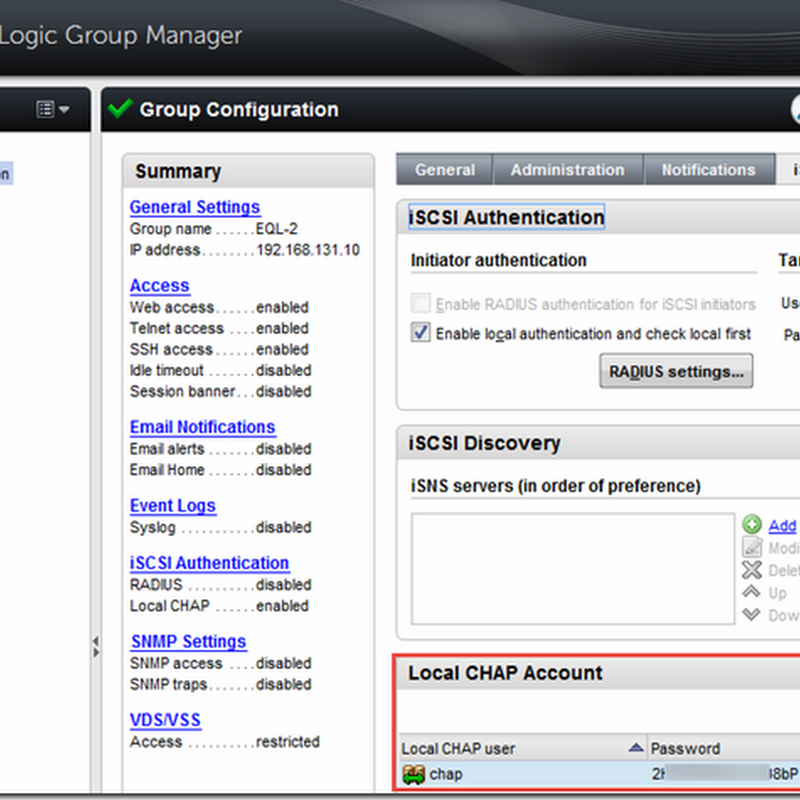
EQL Group Manager
First, prepare your storage array(s), by logging into EQL Group Manager. This post assumes that your basic array IP, access and security settings are in place. Set up your local CHAP account to be used later. Your organization’s security access policies or requirements might dictate a different standard here.

Create and assign an Access Policy to the VDS/VSS in Group Manager otherwise this volume will not be accessible. This will make subsequent steps easier when it’s time to configure ASM.
Create some volumes in Group Manager now so you can connect your initiators easily in the next step. It’s a good idea to create your cluster quorum LUN now as well.

Host Network Configuration
First configure the interfaces you intend to use for iSCSI on your cluster nodes. Best practice says that you should limit your iSCSI traffic to a private Layer2 segment, not routed and only connecting to the devices that will participate in the fabric. This is no different from Fiber Channel in that regard, unless you are using a converged methodology and sharing your higher bandwidth NICs. If using Broadcom NICs you can choose Jumbo Frames or hardware offload, the larger frames will likely net a greater performance impact. Each host NIC used to access your storage targets should have a unique IP address able to access the network of those targets within the same private Layer2 segment. While these NICs can technically be teamed using the native Windows LBFO mechanism, best practice says that you shouldn’t, especially if you plan to use MPIO to load balance traffic. If your NICs will be shared (not dedicated to iSCSI alone) then LBFO teaming is supported in that configuration. To keep things clean and simple I’ll be using 4 NICs, 2 dedicated to LAN, 2 dedicated to iSCSI SAN. Both LAN and SAN connections are physically separated to their own switching fabrics as well, this is also a best practice.

MPIO - the manual method
First, start the MS iSCSI service, which you will be prompted to do, and check its status in PowerShell using get-service –name msiscsi.

Next, install MPIO using Install-WindowsFeature Multipath-IO

Once installed and your server has been rebooted, you can set additional options in PowerShell or via the MPIO dialog under File and Storage Services—> Tools.

Open the MPIO settings and tick “add support for iSCSI devices” under Discover Multi-Paths. Reboot again. Any change you make here will ask you to reboot. Make all changes once so you only have to do this one time.

The easier way to do this from the onset is using the EqualLogic Host Integration Tools (HIT Kit) on your hosts. If you don’t want to use HIT for some reason, you can skip from here down to the “Connect to iSCSI Storage” section.
Install EQL HIT Kit (The Easier Method)
The EqualLogic HIT Kit will make it much easier to connect to your storage array as well as configure the MPIO DSM for the EQL arrays. Better integration, easier to optimize performance, better analytics. If there is a HIT Kit available for your chosen OS, you should absolutely install and use it. Fortunately there is indeed a HIT Kit available for Server 2012 R2.

Configure MPIO and PS group access via the links in the resulting dialog.

In ASM (launched via the “configure…” links above), add the PS group and configure its access. Connect to the VSS volume using the CHAP account and password specified previously. If the VDS/VSS volume is not accessible on your EQL array, this step will fail!

Connect to iSCSI targets
Once your server is back up from the last reboot, launch the iSCSI Initiator tool and you should see any discovered targets, assuming they are configured and online. If you used the HIT Kit you will already be connected to the VSS control volume and will see the Dell EQL MPIO tab.

Choose an inactive target in the discovered targets list and click connect, be sure to enable multi-path in the pop-up that follows, then click Advanced.

Enable CHAP log on, specify the user/pw set up previously:

If your configuration is good the status of your target will change to Connected immediately. Once your targets are connected, the raw disks will be visible in Disk Manager and can be brought online by Windows.

When you create new volumes on these disks, save yourself some pain down the road and give them the same label as what you assigned in Group Manager! The following information can be pulled out of the ASM tool for each volume:

Failover Clustering
With all the storage pre-requisites in place you can now build your cluster. Setting up a Failover Cluster has never been easier, assuming all your ducks are in a row. Create your new cluster using the Failover Cluster Manager tool and let it run all compatibility checks.

Make sure your patches and software levels are identical between cluster nodes or you’ll likely fail the clustering pre-check with differing DSM versions:

Once the cluster is built, you can manipulate your cluster disks and bring any online as required. Cluster disks will not be able to be brought online until all nodes in the cluster can access the disk.

Next add your cluster disks to Cluster Shared Volumes to enable multi-host read/write and HA.

The new status will be reflected once this change is made.

Configure your Quorum to use the disk witness volume you created earlier. This disk does not need to be a CSV.

Check your cluster networks and make sure that iSCSI is set to not allow cluster network communication. Make sure that your cluster network is setup to allow cluster network communication as well as allowing client connections. This can of course be further segregated if desired using additional NICs to separate cluster and client communication.

Now your cluster is complete and you can begin adding HA VMs, if using Hyper-V, SQL, File or other roles as required.


Hi,
ReplyDeletechap should be enter in HIT kit and not in iscsi initiaor !!!!
and tick uise chap for discovery